CSS selectors: What they are and how to use them
Understanding how to use CSS to select HTML elements and apply styles is critical for all front-end developers. Benjamin outlines the different selector types and how to use them in this article.
Table of contents
As a front-end developer, understanding CSS selectors and how they work is like having a key to control the look and feel of your web pages. In this article, you will learn all about CSS selectors, what they are, and how to make the most of them.
What are CSS selectors?
CSS Selectors allow you to choose specific HTML elements on a web page and add styles. Once you get the hang of them, they offer great flexibility. These selectors form the foundation for creating beautiful web pages.
But before you learn the various selectors, let’s first discuss two key concepts. Often, when you use the right selectors and your styles don’t work as expected, it’s one of these two principles at play.
The source order principle
This principle states that the last declaration wins when you have two or more selectors of the same specificity level.
For example, assuming you have two type selectors p in your stylesheet. The first adds a red color, and the second adds a blue color.
p { color: red; }


p { color: blue; }
The second rule will override the first rule because it was the last to be defined. The paragraphs will have a color of blue.
The specificity principle
This is a principle that shows which selector should take precedence when more than one CSS rule targets the same HTML element. You can think of specificity as a kind of ranking system for selectors.
The following is the specificity hierarchy for CSS selectors.
-
Universal selector (low specificity)
-
Type selectors
-
Class selectors
-
Pseudo-classes, Attribute selectors
-
ID selector (high specificity)
Let’s see an example of specificity at work. Below is a paragraph element with a class of greeting.
<!-- HTML -->
<p class="greeting">Welcome to Frontend Mentor</p>
/* CSS */
.greeting {
  color: green;
}

p {
  color: red;
}
In the stylesheet are two selectors. A type selector p and a class selector .greeting. They both target the same paragraph element. However, the class selector has a higher specificity than the type selector. This means the color of the paragraph is going to be green even though the p selector is last in the source order.
CSS selector types
This article covers the following types of CSS selectors. Learning how to use them will make your work with CSS much easier.
-
Basic CSS selectors
-
Combined CSS selectors
-
CSS attribute selectors
-
CSS pseudo-element selectors
-
CSS pseudo-class selectors
Basic CSS selectors
These are the most straightforward ways to select HTML elements on a web page. They include the universal selector, type selectors, IDs, and classes.
Universal selector
This selects all the elements on a page. It’s useful for quick test situations. But it's not recommended for production code as it puts unnecessary weight on the browser. And can negatively affect performance. It’s denoted by the star (*) symbol.
For example, using the universal selector, the color blue is added to all the elements on the page.
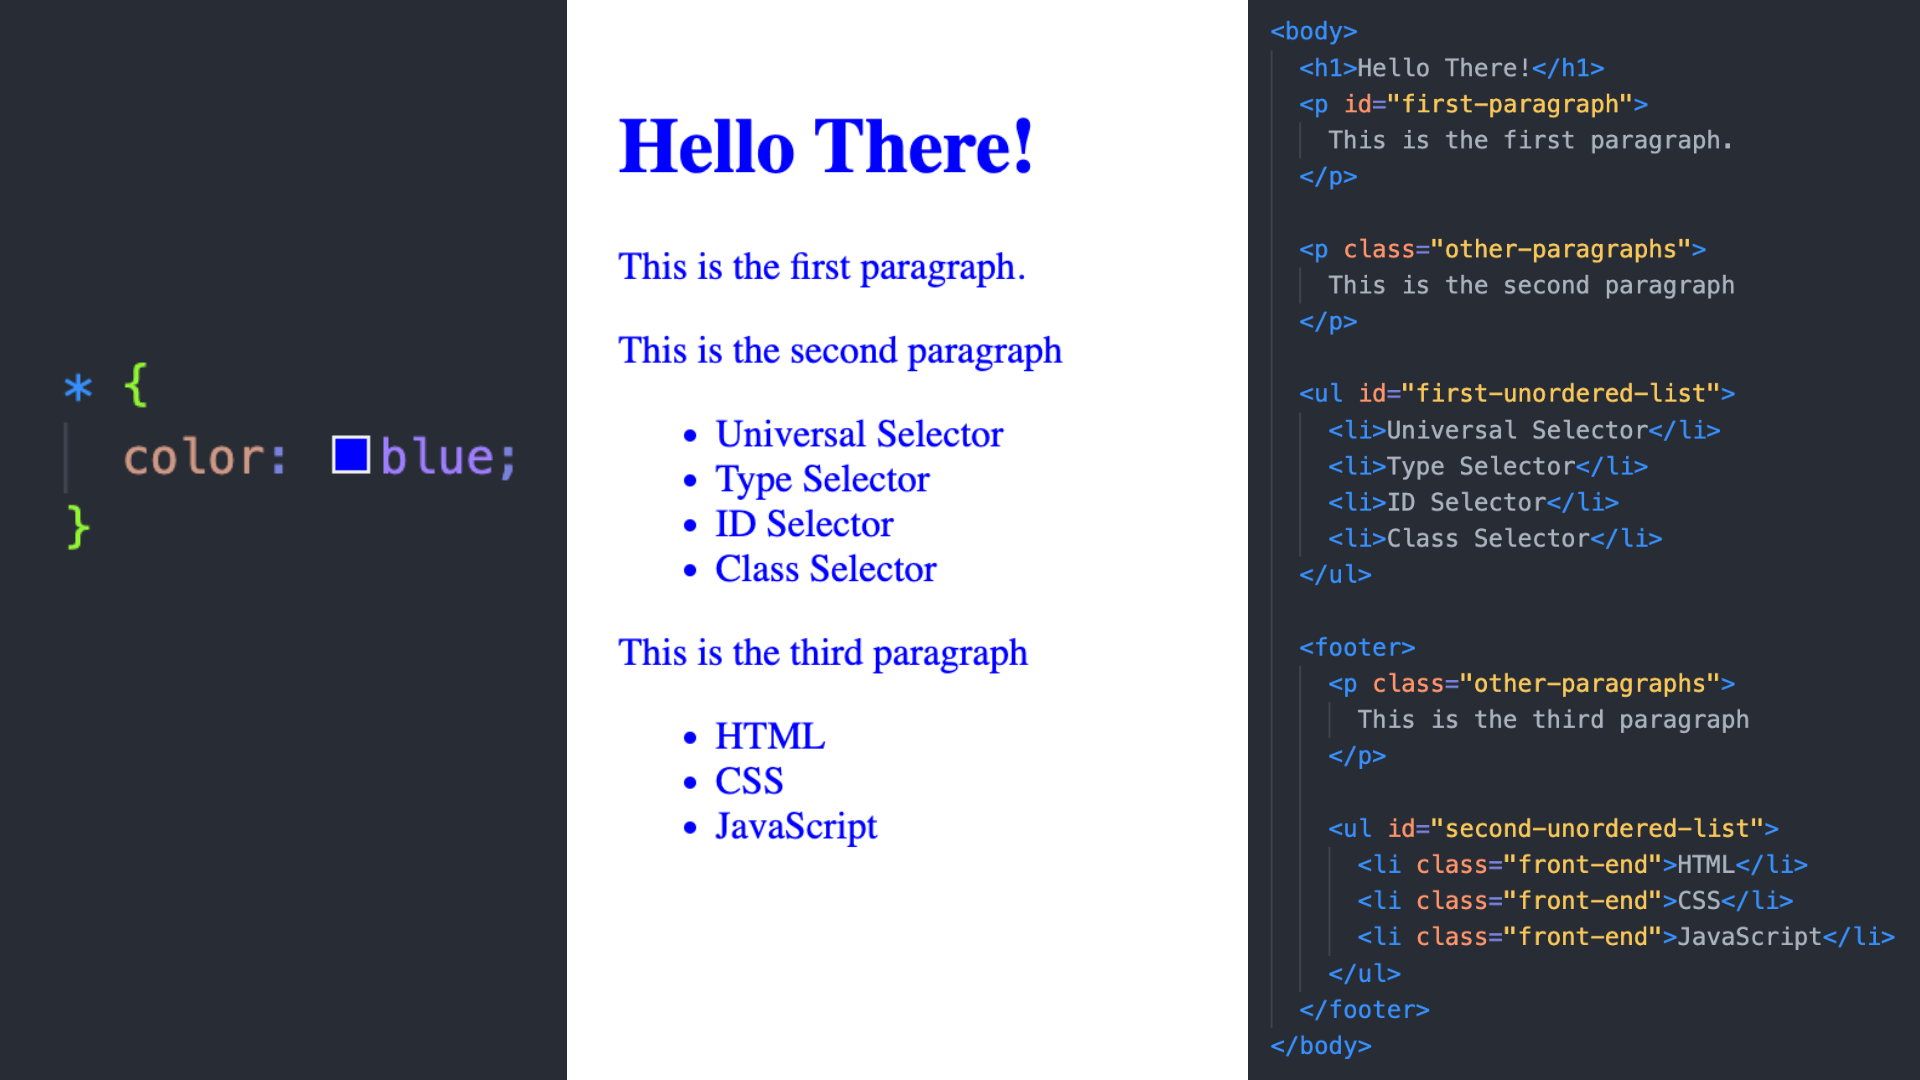
Practice using the universal selector.
Type selector
You use this when you want to select all elements of the same type. The selection is based on the HTML tag name. For example, to select all paragraphs, you use the p tag.
Example:

The p selector adds the color blue to all three paragraphs on the page.
Practice using the element selector.
ID selector
This is denoted by the # symbol. You use ID selectors to target an element in your HTML with a unique element ID. ID selectors have a high specificity, which means they override the styles you set with other selectors.
Example:
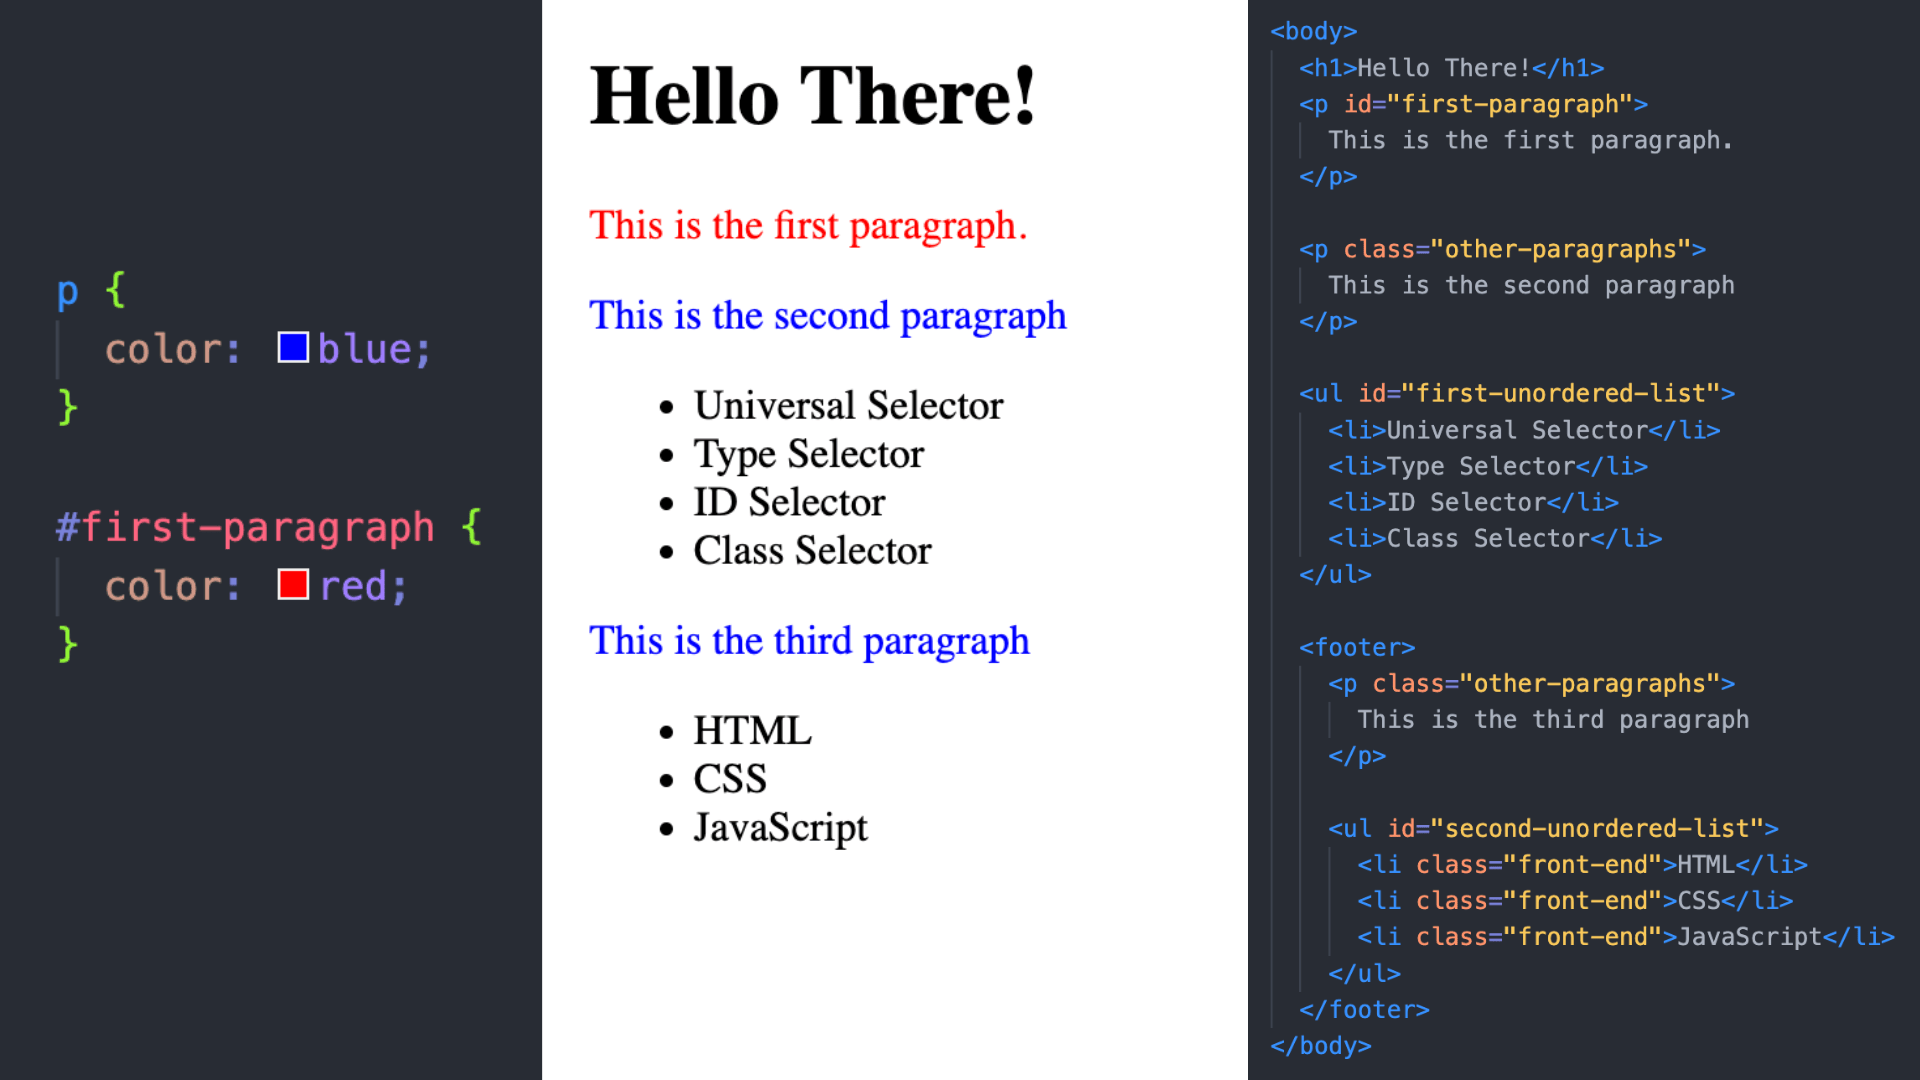
In the example above, the first type selector p adds the color blue to all paragraphs. However the ID selector #first-paragraph overrides that style by adding the color red to the first paragraph.
Practice using the ID selector.
Class selector
This is the recommended selector for adding the same style to a group of elements. To use a class selector, you write a period . before the name of the class. The class selector is useful because it helps you obey the DRY (Don't Repeat Yourself) principle.
Example:

The second and third paragraphs both have a class of .other-paragraphs. The browser, therefore, applies the same style to both of them.
Practice using the class selector.
Combined CSS selectors
These types of selectors are a combination of the other selectors. Using them allows you to make more precise selections of HTML elements.
Grouping selector
Syntax: x, y
This selector allows you to apply the same styles to two or more elements. To use the selector, write the names of the elements you want to style. And separate the names with a comma.
Note: There should be no comma after the last element. Otherwise, the grouping selector will not work.
Example:
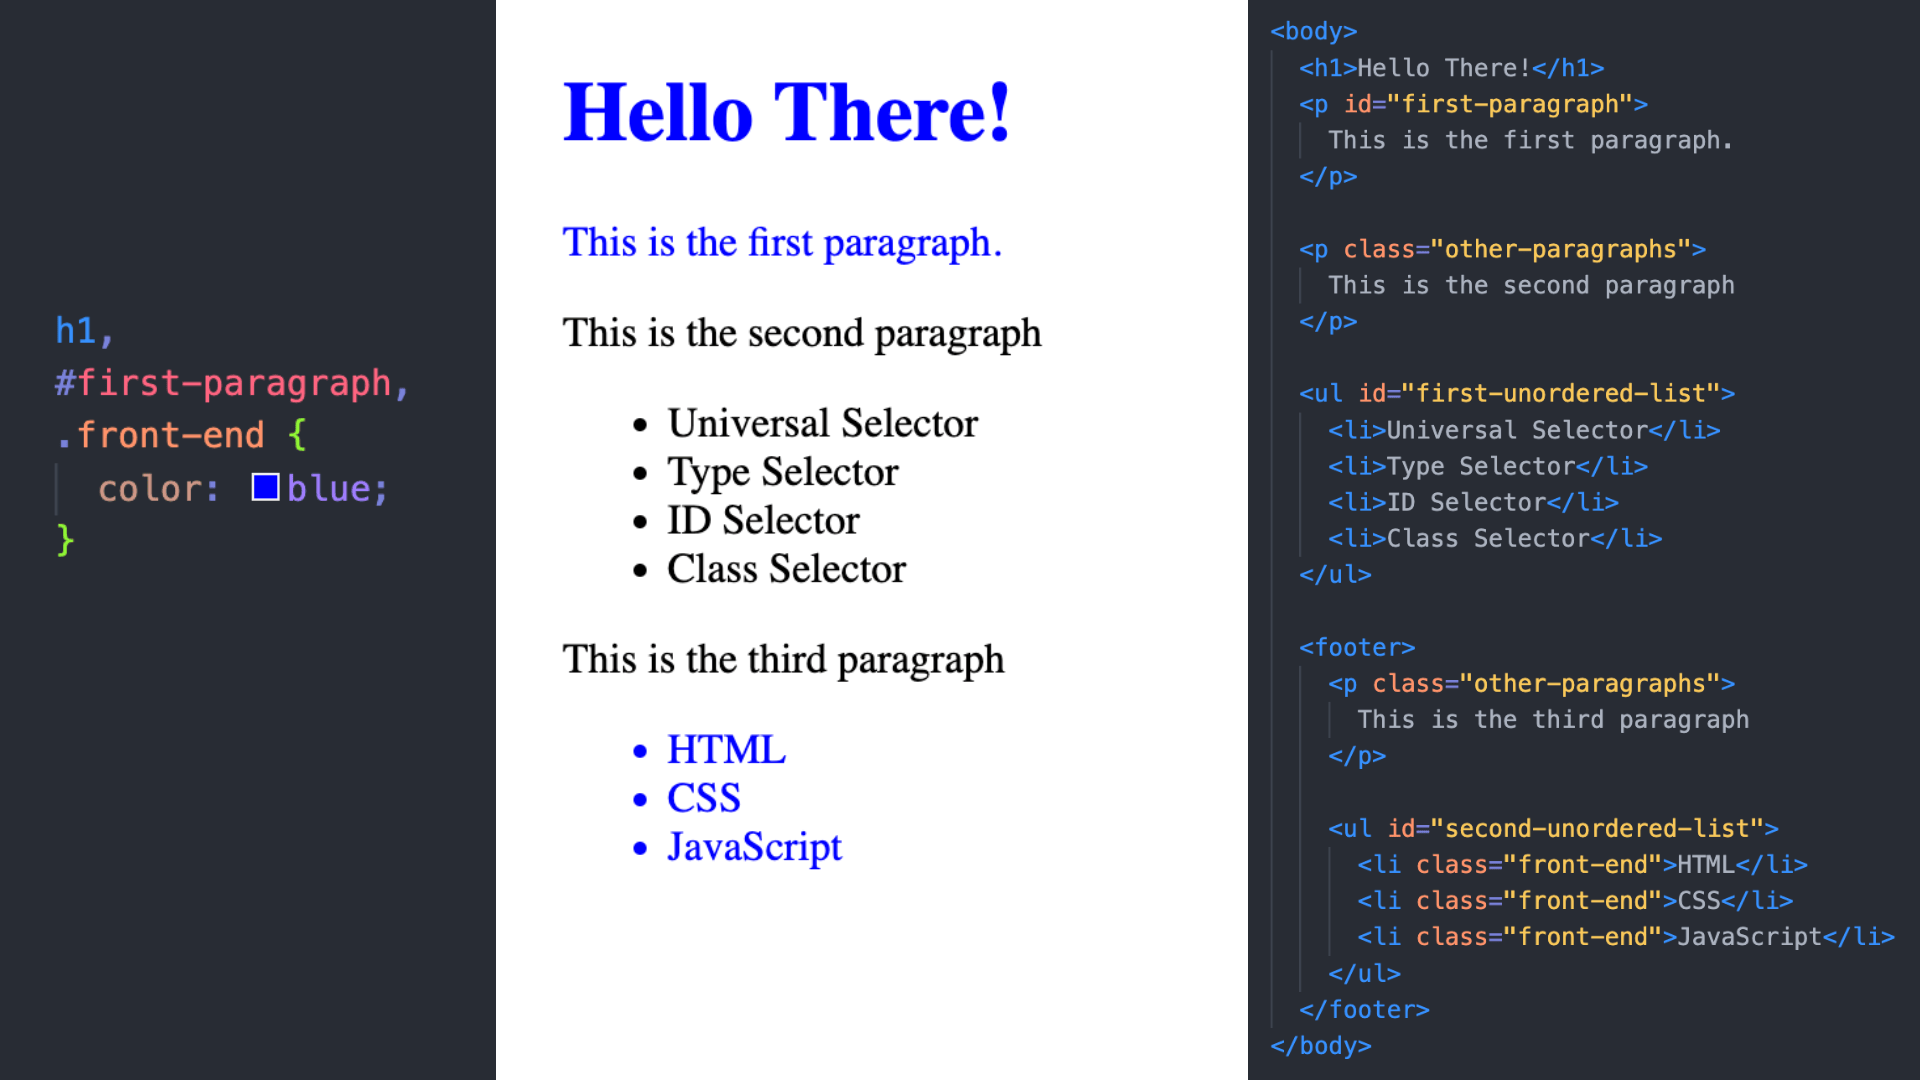
The grouping selector is used here to add the color blue to the h1, the paragraph with the #first-paragraph ID, and the list items with a class of .front-end.
Practice using the grouping selector.
Descendant selector
Syntax: x y
You use this when you want to select all of a particular element (y) inside of another element (x). Note that the y elements do not have to be direct children of the x element.
To use this selector, first write the name of the parent element x, leave a space, and then the name of the descendant element y.
Example:

The descendant selector is used here to select all paragraphs inside the body. Note how the third paragraph is also included though it’s not a direct child of the body element.
Practice using the descendant selector.
Direct child selector
Syntax: x > y
Similar to the descendant selector but selects only direct children. While the descendant selector will select all y inside x, this selector selects only y elements that are direct children of x.
Example:

Only the first two paragraphs (which are direct children of the body element) are selected this time around.
Practice using the direct child selector.
Adjacent sibling selector
Syntax: x + y
When you want to target an element that comes directly after another element in your HTML, you use the adjacent sibling selector.
First, write the name of the element that comes first, x, followed by the plus symbol +, and then the name of the element you want to add style to, y.
Example:

This example selects the paragraph that comes directly after the h1 header, which is the first paragraph in this case.
Practice using the adjacent sibling selector.
General sibling selector
Syntax: x ~ y
This will target all y elements that come after an x element. The key thing to note with this selector is that the x and y elements must be siblings. To use it, separate the names of the elements with the tilde ~ sign.
Example:

The first and second paragraphs were selected because they are both siblings of the h1 element. The third paragraph, which is a child of the footer (and not a sibling of the h1 header), is not selected.
Practice using the general sibling selector.
Chain selector
Syntax: x.y
You can chain selectors together when selecting elements based on certain conditions. The key is to concatenate the selectors without any spaces. Doing so will ensure that only the elements that satisfy all the specified conditions will get the styles. You can chain a combination of selectors like two classes, element, and ID, or even more complex combinations.
Example:

The li.front-end selector selects all list items with a class of front-end. Note how other list items without the front-end class are ignored.
Practice using the chain selector.
CSS attribute selectors
The attribute selectors allow you to target an element using its attribute. This means whether or not the style is applied depends on the presence or value of the given attribute.
To better understand attribute selectors, let’s use the HTML code below. It’s a simple markup of three elements. A header, a paragraph, and a button.
<h1 class="active title">Welcome to Frontend Mentor</h1>

<p class="paragraph">
  Improving your coding skills by building realistic projects
</p>

<button type="button" class="btn-active">
  Login with GitHub
</button>
Attribute exists
Syntax: [attribute]
This will check whether the attribute you specify exists on the HTML elements. The selector doesn't care about the value of the attribute. All it cares about is whether the attribute exists. And if it does, it applies the style.
Example:

The [type] selector adds the color blue to the button because it has the type attribute.
Practice using the “attribute exists” selector.
Attribute equals
Syntax: [attribute="value"]
You use this selector to style elements with a specific attribute and a matching value. The given value of the selector should be the same as that of the element's attribute. Otherwise, it will not work.
Example:

All three elements have a class. But the [class="paragraph"] selector adds the style to only the element whose class attribute has a value of “paragraph”.
Practice using the “attribute equals” selector.
Attribute starts with
Syntax: [attribute^="value"]
As the name suggests, this will select elements with an attribute whose value starts with a given string. This is denoted by a caret ^ symbol before the equals sign.
Example:
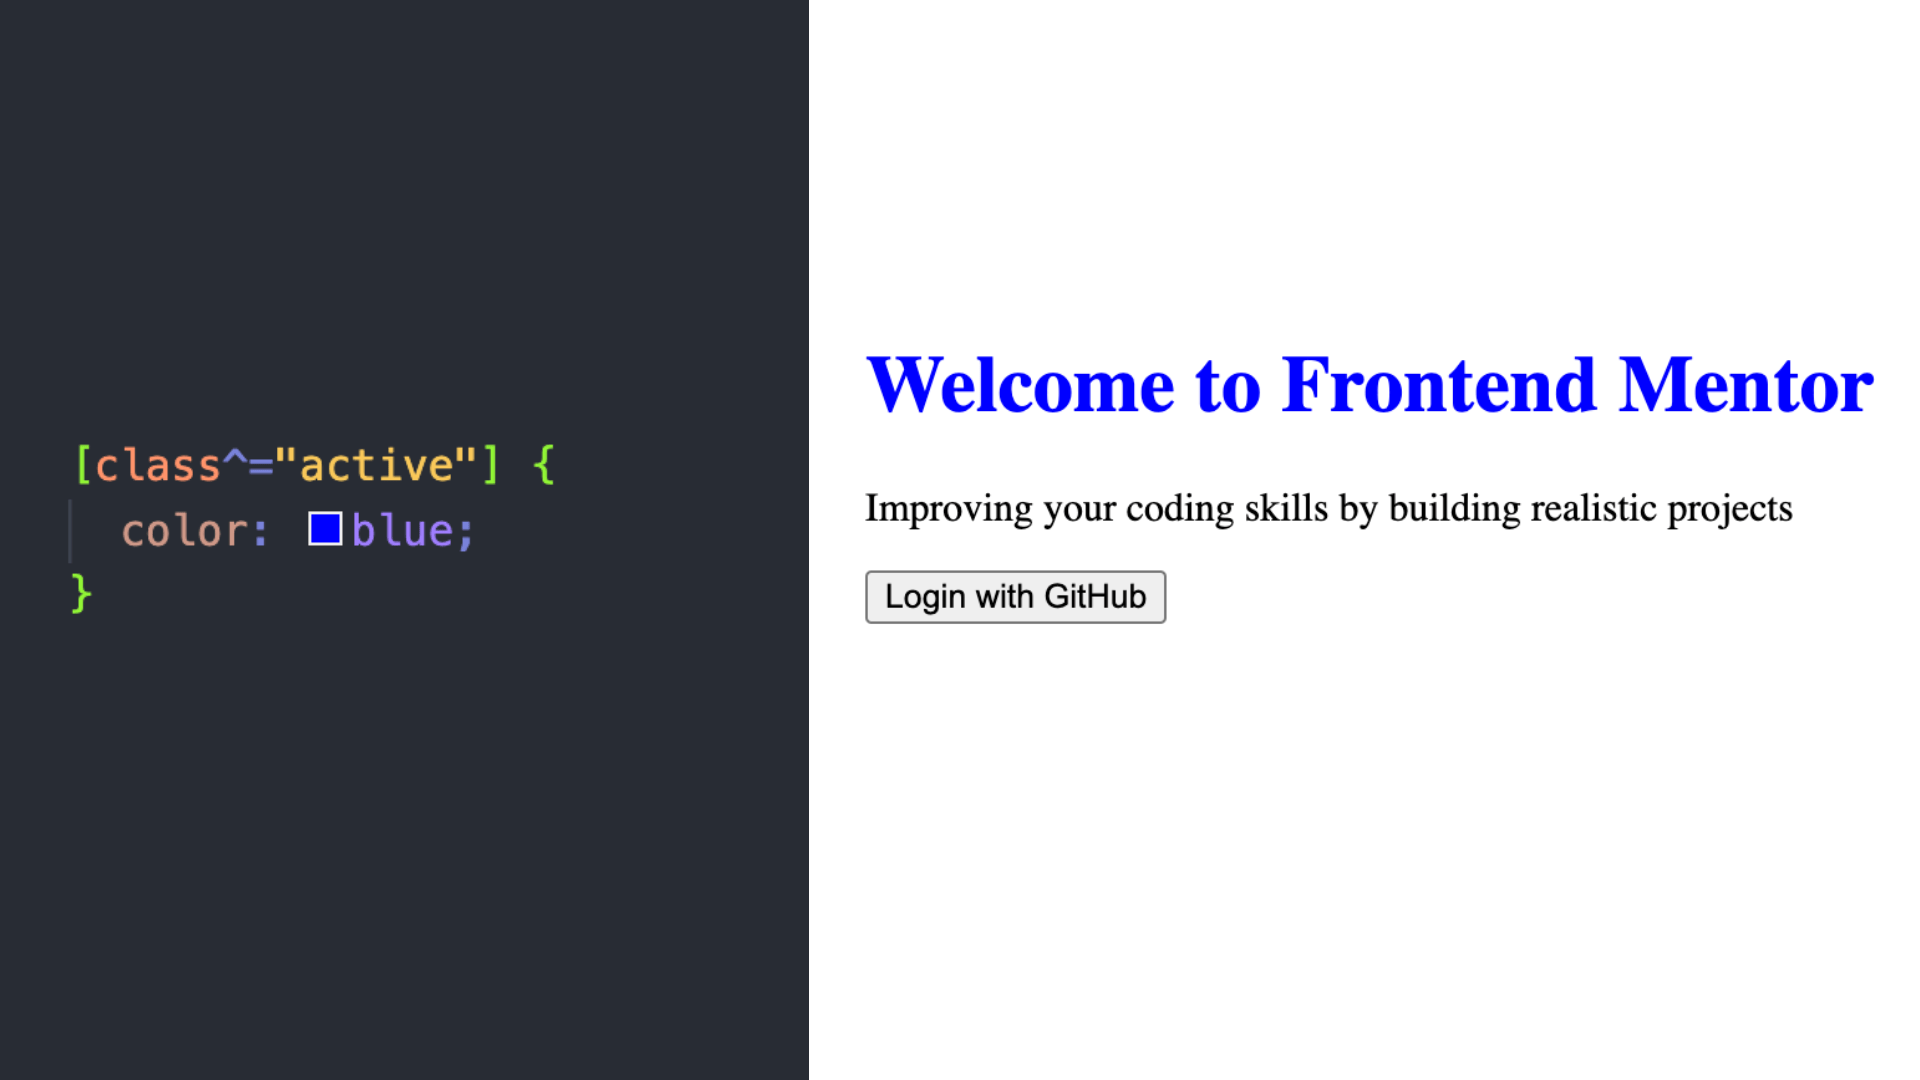
The h1 header now has a color blue because the value of its class attribute begins with the string “active”.
Practice using the “attribute starts with” selector.
Attribute ends with
Syntax: [attribute$="value"]
This is the opposite of the previous attribute selector. Instead of the starting string, it checks whether the value of the attribute ends with a given string.
You denote the "attribute ends with" selector with a dollar sign $ before the equals sign.
Example:

The value of the button’s class btn-active ends with the string “active”. That’s why the color blue is applied to it.
Practice using the “attribute ends with” selector.
Attribute contains
Syntax: [attribute*="value"]
You can use this selector to select elements with a specified attribute whose value contains a given substring. The position of the substring doesn't matter. It could be at the start, in the middle, or at the end.
Example:

The style is applied to both the h1 header and the button because both have classes that contain the string “active”.
Practice using the “attribute contains” selector.
Attribute includes
Syntax: [attribute~="value"]
HTML elements can have attributes with more than one value. These values are separated with spaces. For example, the h1 element has a class attribute with two values (active and title).
In an instance like this, you can use this selector to target the element by checking if one of the values is equal to the given string.
Example:

The color blue is applied on the h1 header because one of the values for its class attribute is “active”.
Practice using the “attribute includes” selector.
CSS pseudo-element selectors
You use the pseudo-element selectors when you want to select and style a specific part of an HTML element. They also allow you to apply styles on elements not part of the HTML structure. These selectors are denoted by double colons (::).
::before
This selector is useful for creating and inserting content before an already existing element in your HTML.
For example, let’s say you want to add an icon in front of the links on a page. With the ::before selector, you can use a content property and set the value to the icon you want to use.
<!-- HTML -->
<a href="http://www.frontendmentor.io">Go to Frontend Mentor</a>
/* CSS */
a::before {
  content: "🚀 "
}
In this example, a rocket icon is placed in front of the link text:

Practice using the ::before selector.
::after
This is the opposite of the ::before selector. You can use it to insert content after an existing HTML element.
Using the previous example, you can place the rocket icon after the link’s anchor text, as shown below:
a::after {
  content: " 🚀"
}

Practice using the ::after selector.
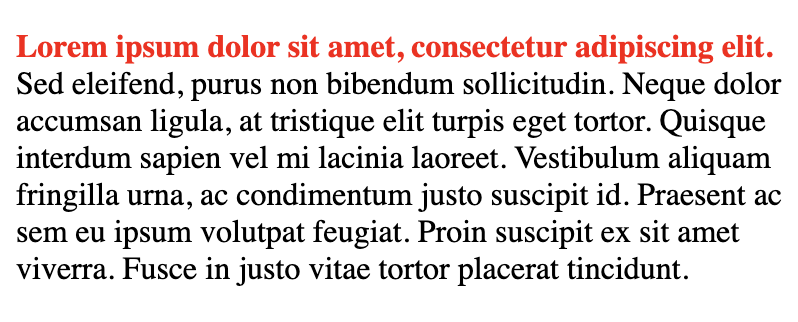
::first-line
This selector works on text elements. It targets the first line of a selected text and adds your style to it.
Note that this only works on block-level elements like paragraphs, headings, divs, etc. It doesn’t work for inline-level elements like span.
Example:
<!-- HTML -->
<p>
  Lorem ipsum dolor sit amet, consectetur adipiscing elit. Sed eleifend, purus non bibendum sollicitudin. Neque dolor accumsan ligula, at tristique elit turpis eget tortor. Quisque interdum sapien vel mi lacinia laoreet. Vestibulum aliquam fringilla urna, ac condimentum justo suscipit id. Praesent ac sem eu ipsum volutpat feugiat. Proin suscipit ex sit amet viverra. Fusce in justo vitae tortor placerat tincidunt.
</p>
/* CSS */
p::first-line {
  color: red;
  font-weight: bold;
}
This example adds the color red and font weight of bold to the first line of the text:
Practice using the ::first-line selector.
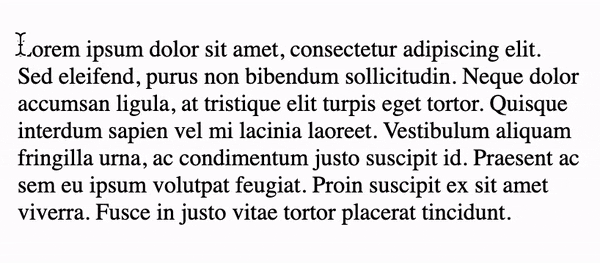
::first-letter
What if you want to style only the first letter? You can use the ::first-letter selector. The ::first-letter selector also works on block-level elements only.
p::first-letter {
  color: red;
  font-size: 3em;
}

The style is added to only the first letter, which in this case is the letter “L”.
Practice using the ::first-letter selector.
::selection
A user can select a text on a webpage by clicking and dragging the mouse over it. The ::selection selector allows you to target and style texts when a user selects it.
Example:
p::selection {
  color: red;
}
The style applies only to the part of the text that is selected (where the user clicks and drags their mouse over).
Practice using the ::selection selector.
::placeholder
All browsers have default styles for placeholder texts. But you can override them using the ::placeholder selector.
In the following example is an email input field with a placeholder text. The selector is used to override the default placeholder text selector.
<!-- HTML -->
<input type="email" placeholder="Enter your email here">
<input type="submit" value="Sign Up">
/* CSS */
::placeholder {
  color: blue;
  font-style: italic;
}
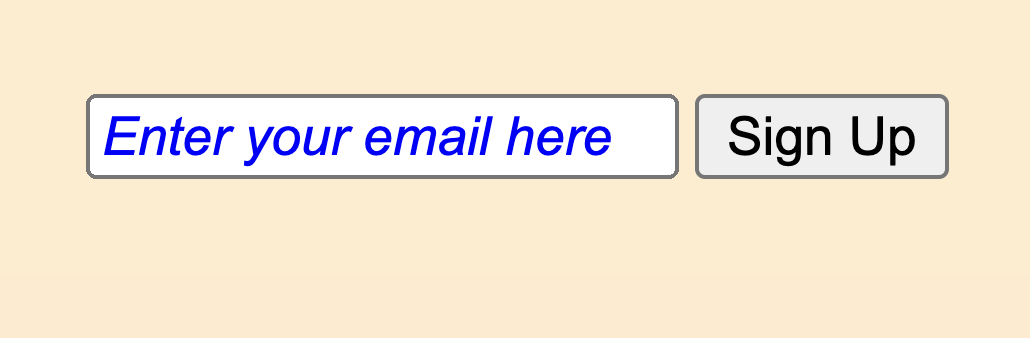
The placeholder text is given a blue color and italic font style.
Other pseudo-elements
At the time of writing, some of the pseudo-element selectors listed below are still experimental. Some browsers may not support their usage. You need to check browser compatibility before you use them.
::marker- Used to select and style markers for list items.::file-selector-button- for targeting input elements withtype="file".::grammar-error- Used to select texts which a user agent determines to include some grammatical error.::spelling-error- You can use this to add styles to words that a user agent highlights as wrongly spelled
CSS pseudo-class selectors
These are selectors that allow you to target your HTML elements based on certain conditions or the state of the elements. You will often use the CSS pseudo-class selectors to apply styles to elements in response to user actions. They are denoted by a single colon (:).
:hover
The styles you specify under this selector will apply whenever the user hovers their mouse on the targeted element.
<!-- HTML -->
<button>Hover me!</button>
/* CSS */
button:hover {
  background-color: blue;
  color: white;
}

The button's background color changes to blue and the text to white anytime you hover the mouse on it.
Practice using the :hover selector.
:active
You can also change the appearance of an element when it’s in an active state. Or at the moment when the user is interacting with it. For example, when a user clicks on a button.
<!-- HTML -->
<button>Click button!</button>
/* CSS */
button:active {
  transform: translateY(7px);
}

The CSS transform property is used to push the button down when the user clicks on it.
Practice using the :active selector.
:visited
The main purpose of this selector is to make it possible to add different styles to links the user clicks or “visits”. It helps give a visual cue to users on which links on a page they’ve visited and which ones they haven’t.
Example:
<!-- HTML -->
<h1>Frontend Mentor</h1>
<a href="https://www.frontendmentor.io/challenges">
  Challenges
</a>
<a href="https://www.frontendmentor.io/solutions">
  Solutions
</a>
<a href="https://www.frontendmentor.io/articles">
  Articles
</a>
/* CSS */
a:visited {
  color: orange;
}

Before visiting the Frontend Mentor challenges page, all the links had the same color. However, after visiting the challenges page, the color of the link’s anchor text changes to orange. The others remain unchanged because they’re yet to be visited.
Practice using the :visited selector.
:not()
The :not pseudo-class selector allows you to target all elements that do not match a specific selector. When you use :not, the style applies to other elements but not the one you specified.
<!-- HTML -->
<a href="https://www.frontendmentor.io/challenges">
  Challenges
</a>
<a href="https://www.frontendmentor.io/solutions">
  Solutions
</a>
<a href="https://www.frontendmentor.io/articles">
  Articles
</a>
<a href="https://www.frontendmentor.io/resources">
  Resources
</a>
/* CSS */
:not([href$="resources"]) {
  color: red;
}

The :not selector here applies the color red to all elements whose href attribute does not end with the string “resources”. Remember the “attribute ends with” selector?
Practice using the :not selector.
:has()
You can use the :has() selector to select elements that have some specified content. It takes a selector as an argument. And targets a parent element with a child element that matches the given selector.
For example, let’s say you want to target all divs that have an unsecured link with "http" instead of "https":
<!-- HTML -->
<div>
  <a href="http://unsafe-link.com">Unsafe link 1</a>
</div>
<div>
  <a href="https://safe-link.com">Safe link</a>
</div>
<section>
  <a href="http://not-safe.com">Unsafe link 2</p>
</section>
/* CSS */
div:has([href^="http://"]) {
  border: 1px solid red;
}

This example uses the :has() selector together with the “attribute starts with” selector. The selector targets any div that has an element with a href attribute. And checks if the href attribute starts the string "http://".
The second unsafe link also has a href with a value that starts with "http://". But the selector ignores it because it’s not inside a div.
:is()
This selector takes in a list of selectors as arguments. And adds the same styles to the specified selectors. It’s similar to the selector with the x, y syntax. But it’s a concise and cleaner alternative. Let’s see an example:
<section>
  <p>Paragraph one</p>
</section>
<article>
  <p>Paragraph two</p>
</article>
<div>
  <p>Paragraph three</p>
</div>
<footer>
  <p>Paragraph four</p>
</footer>
The following will select all paragraphs inside the section, article, or footer elements and add the color red:
section p,
article p,
footer p {
  color: red;
}
But you get the same result with the :is() selector like so:
:is(section, article, footer) p {
  color: red;
}

All the paragraphs but number 3 (the p inside the div) get a red color.
:where()
The :where() pseudo selector works almost the same way as the :is() pseudo selector. The difference lies in how they handle specificity.
-
:is()- When you use the:is()selector with a comma-separated list of selectors, it considers the specificity of each selector and chooses the most specific one as the specificity for the entire group. -
:where()- With the:where()selector, the specificity of the entire group is always considered to be zero, regardless of the specificity of the individual selectors.
To see this difference, let’s apply both the :is() and :where() selectors on the same markup below:
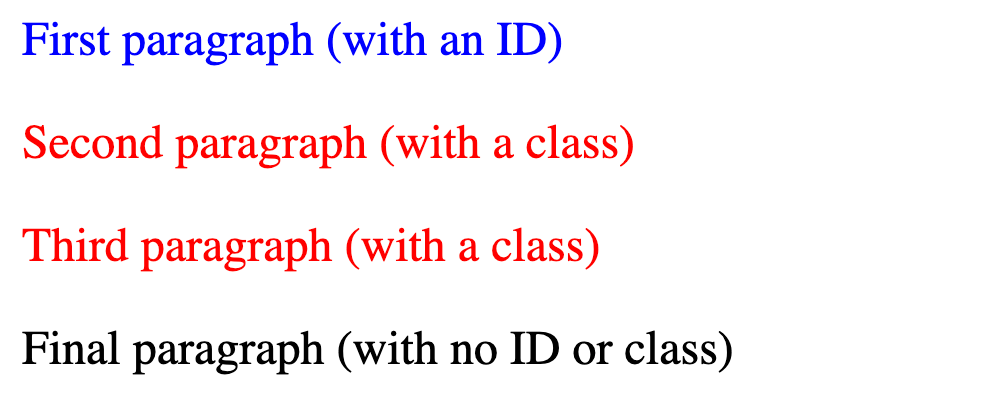
<!-- HTML -->
<p id="first">First paragraph (with an ID)</p>
<p class="middle">Second paragraph (with a class)</p>
<p class="middle">Third paragraph (with a class)</p>
<p>Final paragraph (with no ID or class)</p>
/* CSS */
:is(#first, .middle) {
  color: blue;
}

.middle {
  color: red;
}

The .middle class selector below the :is() selector does not work because .middle class selector inside the :is() selector is given the same specificity level as the #first ID selector. This means it has a higher specificity than the one below.
Now, let’s see how the :where() selector differs:
:where(#first, .middle) {
  color: blue;
}

.middle {
  color: red;
}
The .middle class selector below the :where() selector works here because all selectors within :where() have a specificity of zero where it’s an ID, class, or anything else.
:nth-child selectors
These selectors target elements based on their position within their parent element. There are several nth-child selectors you can use for different scenarios.
:nth-child(x)- Selects the element in the x position of its parent.:first-child- Selects the first child of the parent.:last-child- Selects the last child of the parent.:nth-child(odd)- Selects all child elements in odd number positions.:nth-child(even)- Selects all child elements in even number positions.
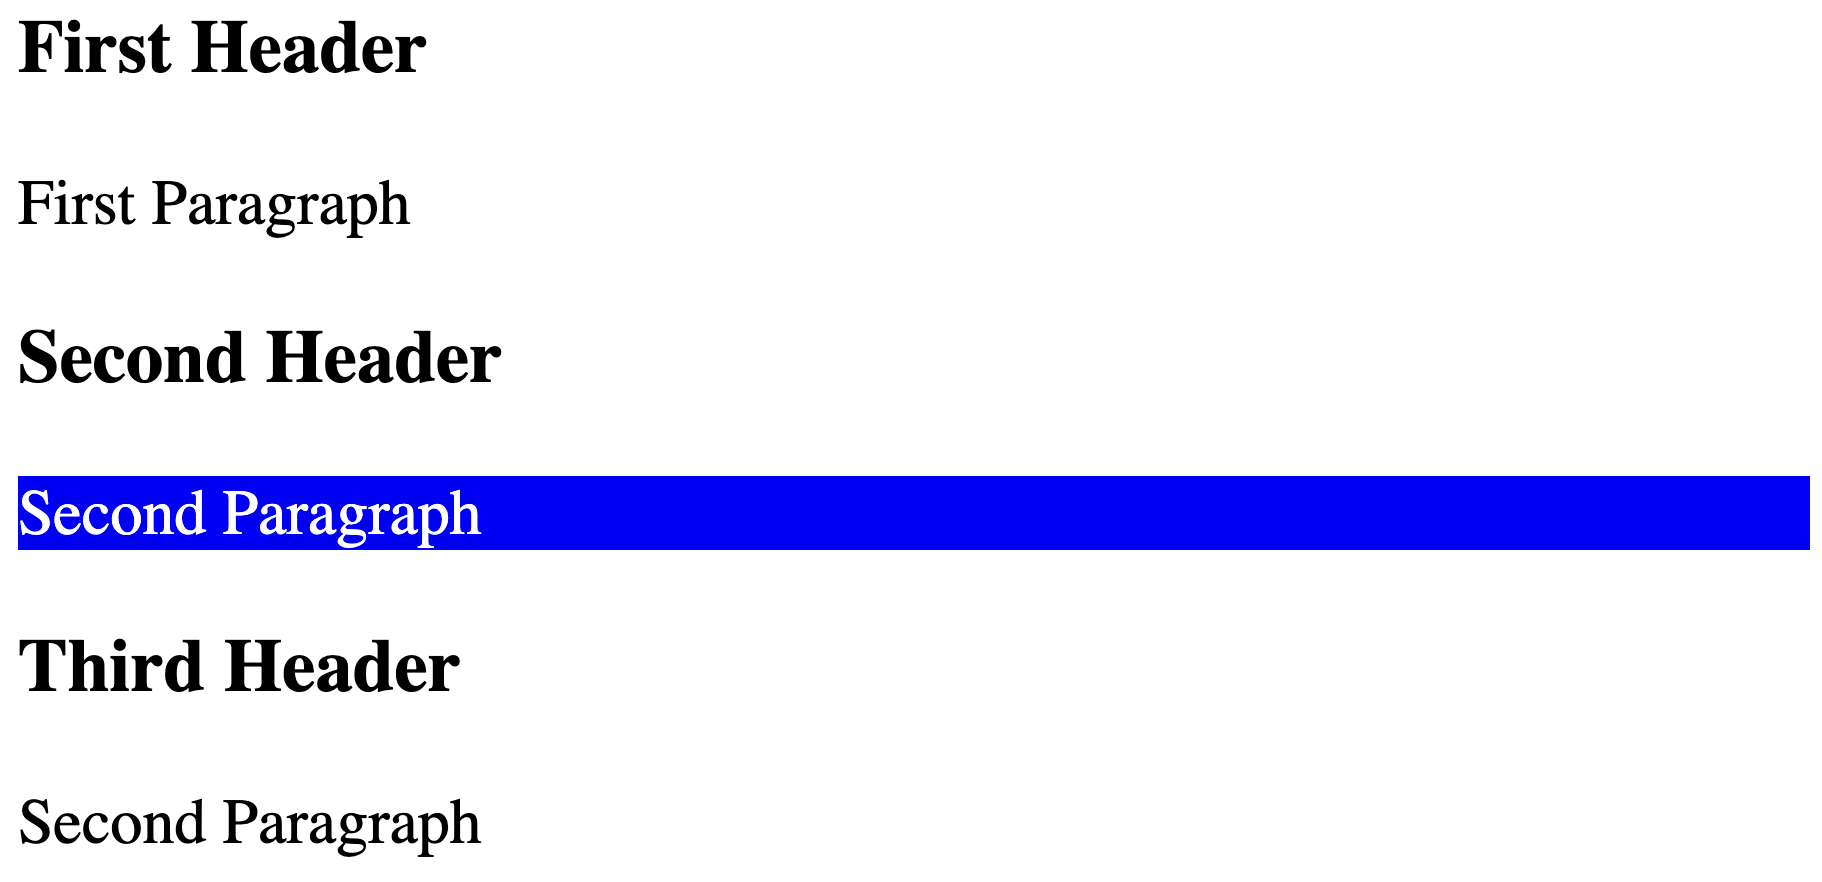
<!-- HTML -->
<div>
  <h3>First Header</h3>
  <p>First Paragraph</p>
  <h3>Second Header</h3>
  <p>Second Paragraph</p>
  <h3>Third Header</h3>
  <p>Second Paragraph</p>
</div>
/* CSS */
div :nth-child(2) {
  background-color: blue;
  color: white;
}

The selector div :nth-child(2) selects the first paragraph because it is the second (2) child of the div element.
The difference between the :nth-child selectors and :nth-of-type selectors is in how they count the elements within the parent container.
:nth-child- Selector counts all elements without regard for the element type.:nth-of-type- Selector counts only elements of the same type.
:nth-of-type selectors
You can use these selectors to select elements based on their position in the parent compared to other elements of the same type.
:nth-of-type(x)- Selects the element of a given type that is at positionx.:first-of-type- Selects the first element of a given type within the parent.:last-of-type- Selects the last element of a given type within the parent.:nth-of-type(odd)- Selects all elements of a type that are in an odd number position.:nth-of-type(even)- Selects all elements of a type that are in an even number position.
div p:nth-of-type(2) {
  background-color: blue;
  color: white;
}
Unlike nth-child(2) which selects the first paragraph because it’s the second child of the div, the p:nth-of-type(2) selects the second paragraph in the div.
Other pseudo-classes
:checked- For styling form elements like checkboxes and radio elements when a user selects (or checks) them.:focus- Often used for styling input elements when a user clicks on them.:validand:invalid- Targets form elements when they are valid or invalid based on the inputs provided. These are useful for form validation.:optional- For any input elements without the required attribute.
Practice CSS selectors with games
To get comfortable with CSS Selectors, you should practice using them. The following is a list of some free online resources you can use for practice. These will help you solidify your knowledge of CSS selectors in a fun and interactive way.
Conclusion
Whether you are creating a simple layout or a complex user interface, a strong understanding of CSS selectors is crucial. It will give you CSS superpowers. Not only will you write styles that meet your design objective, but also be easy to maintain.
Continue to practice and experiment with the various selectors. Doing so will help you get familiar with their nuances. And help you to use them more efficiently in your projects. You can also bookmark this article for future reference and return to it when you need a quick reminder.
Take your skills to the next level
- AI-powered solution reviews
- 50+ portfolio-ready premium projects
- Professional Figma design files