Git and GitHub essentials: A beginner's guide
Getting comfortable with Git version control is something all developers need to do. In this article, Hikmah gives an overview of Git and GitHub and outlines the most common commands.
Table of contents
In the early stages of learning software development, chances are you have heard or glimpsed the words Git and GitHub. These are popular words in software development, and it is essential that you know what they are and why they are important to learn.
When building projects, you’ll need to keep track of any changes you make in your project to organize and collaborate with others on specific or multiple projects. For you to do so, these projects need to be tracked and recorded every step of the way. This is where version control and its tools, Git and GitHub, come in.
Version control is a system that records changes to a file or set of files over time so that you can recall specific versions later. It helps coordinate work among multiple developers, ensuring everyone is on the same page and facilitating collaboration. Git is the most popular Version Control System used by developers. GitHub is an online platform to help developers manage their Git repositories. In addition to GitHub, there are alternative online platforms for version control, such as BitBucket and GitLab.
In this article, I’ll guide you in breaking down these concepts, telling you all you need to know about them as an absolute beginner.
Understanding Git, GitHub, and version control
What is Git?
Git is a version control system that allows you to keep track of changes you make when building a project with code. It also allows multiple developers to work on a project without interfering with each other's work. With Git, you can revert to previous stages or versions of your project, track changes, and collaborate effectively.
When taking snapshots of a person moving, each of these snapshots can have very similar poses, capturing the incremental movements and changes over time. Similarly, in software development, Git takes snapshots, known as commits, of a project's codebase at various stages. These commits serve as checkpoints that document the evolution of the code, enabling developers to review, compare, and, if necessary, undo changes back to previous states.
When collaborating with one or more developers, each developer can work on their own local copy of the project by creating a personal branch, allowing them to make changes independently to the code. These branches serve as isolated spaces for developers to work on specific features or fixes, separate from the main code stored in the primary branch, which serves as the root branch of the repository. Once modifications are made, developers can merge their changes into the main branch, ensuring a unified project without the risk of code conflicts.
What is GitHub?
GitHub is an online platform where developers store, manage, and share their code or projects. All projects you have hosted on GitHub can be accessed from any computer, making it accessible and easy to code anywhere.
Each project on GitHub is called a repository, or “repo” for short. A repository can be public (accessed by anyone and everyone) or set to private (accessed only by the owner and those to whom the owner gives access).
In addition to code management, GitHub is used for collaboration and open-source development. Open source refers to making source code available for others to view, use, modify, and distribute for free. This means that the repository is free to use and allows users to access, inspect, and contribute to its underlying source code. You automatically become an open-source contributor by contributing to a source code and having your code accepted.
Beginners tend to mistake Git and GitHub with each other. GitHub is a ‘hub’ or platform that uses Git underneath it for version control, providing a UI. It's important to note that Git can be used independently without the need for a platform like GitHub, or other version control platforms such as GitLab and BitBucket, as it functions as a standalone version control system. However, GitHub cannot be used without Git. That’s the difference between Git and GitHub.
Git commands
Git set up
Before getting started and using common Git commands, it's important to set up Git on your local machine. You can download Git here. Ensure to choose based on your operating system.

When installing Git, choosing Bash as your command-line interface is recommended. Bash (Bourne Again Shell) is a widely used shell that provides a powerful and efficient command-line environment. Selecting Bash during Git installation ensures a consistent and familiar experience when working with Git commands. Bash not only integrates well with Git but also offers a lot of features when working with version control.
After installing the Git package, check on the terminal to verify that Git was successfully installed.
git --version
Configure your identity using the following commands:
Enter your username:
git config --global user.name "Your Name"
To confirm that you have set your Git username correctly, enter:
git config --global user.name
This should return the username you entered.
Next, your email:
git config --global user.email "[email protected]"
Check to confirm the email:
git config --global user.email
Git is now ready for use!
Common Git commands
Let’s discuss the common Git commands you should know when using Git and GitHub.
git add
The git add command is used to stage changes for the next commit. When you modify your files in a Git repository, these changes are initially in your working directory, ie, only locally on the computer used, but are not automatically included in the next commit. Staging means preparing changes for a commit by marking them as ready to be included in the next commit of the project.
git add [filename]
To add all changes at once, use:
git add .
git commit
Once your changes are staged, it's time to save them. The git commit command captures a snapshot of your work along with a brief message describing the changes.
git commit -m "Your message about what you did here"
As a developer, prioritize writing clear, concise commit messages that immediately convey the purpose of the changes. For instance, if you're modifying an input type, a good commit message could be:
git commit -m "Change input type for the pin from text to number"
Remember, keep it descriptive and to the point.
git status
At any point, you can check the status of your repository using git status. This command provides information about which files are modified, staged, or committed.
git status
In summary, first, you add the files to a staging area. The files are ready to be committed at this point. The next step is to commit the changes with a descriptive message saying what changes were made in the commit. You can choose to check the status of your repository at any point.

Creating, switching, and merging branches
A branch in Git is a separate or new version of the main repository. By default, when a repository is created, there is a main branch, the first and only branch in the repository. The default name of this branch is master, but is often updated to main, which is what I'll use going forward.
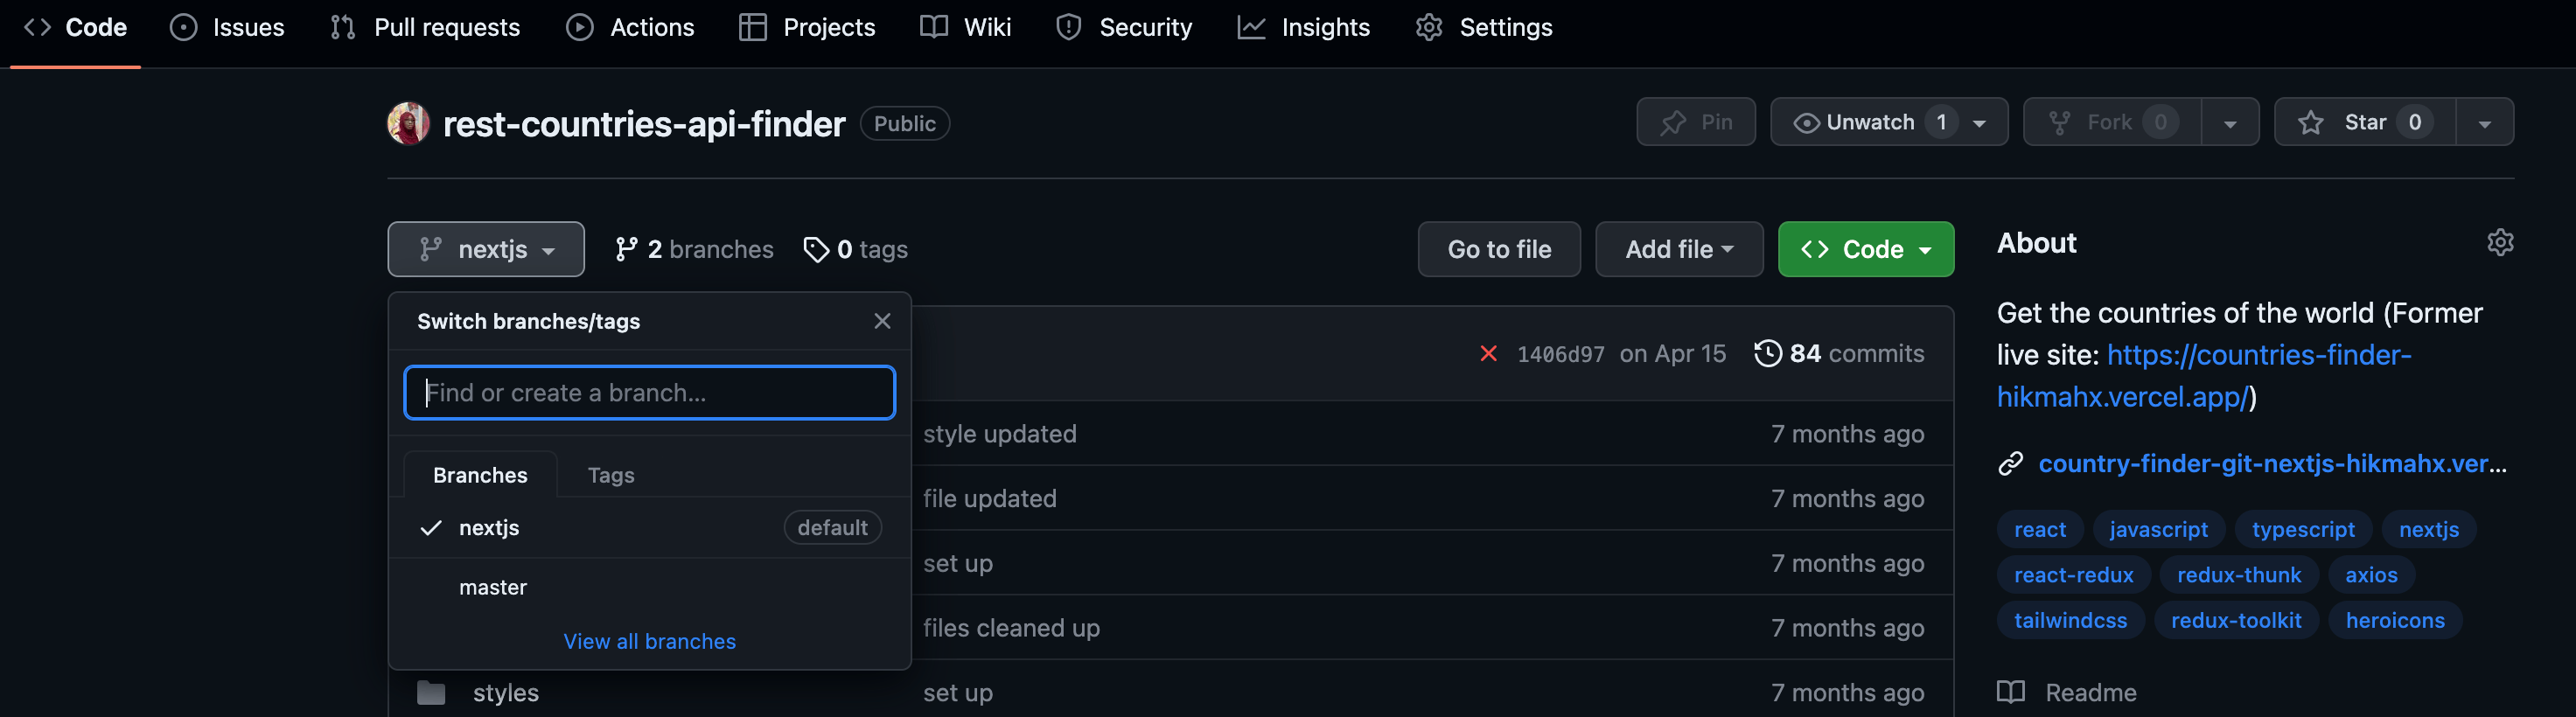
Branches in Git allow you to diverge from the main line of development and continue working without affecting that main line. This is especially useful for developing new features, bug fixes, collaborations, or experimental changes. Each branch represents an independent line of development with its own commit history.
You can experiment without affecting the main project. Here's how you create, switch, and merge branches:
git branch
You can use the git branch command to create and name a new branch:
git branch [branch_name]
git checkout
After creating a new branch or having more than one branch, you can switch between these branches using:
git checkout [branch_name]
Your working directory and files will be updated to reflect the chosen branch. Remember to pull changes after switching branches to have all the latest updates.
git merge
To merge changes from one branch into another, you can use git merge. For example, if you wanted to merge some changes from a feature branch into the main branch, you would first switch to the main branch using git checkout:
git checkout main
Then, merge the changes from the branch containing the feature:
git merge [branch_name]
This process incorporates the updates from the feature branch into the main branch, ensuring that the main branch reflects the latest code changes.
Working with GitHub
Creating a GitHub repository
Before working with GitHub, first create your GitHub account. Click on the "Sign up" button and follow the instructions to create your GitHub account.

After creating an account, log in to GitHub using your newly created username and password.
To create a new repository, you either create one on GitHub or initialize new ones on your local machine using Git commands.
Creating a new repository on GitHub
To create a new repo, click the “+” dropdown in the top right corner and select "New repository.”
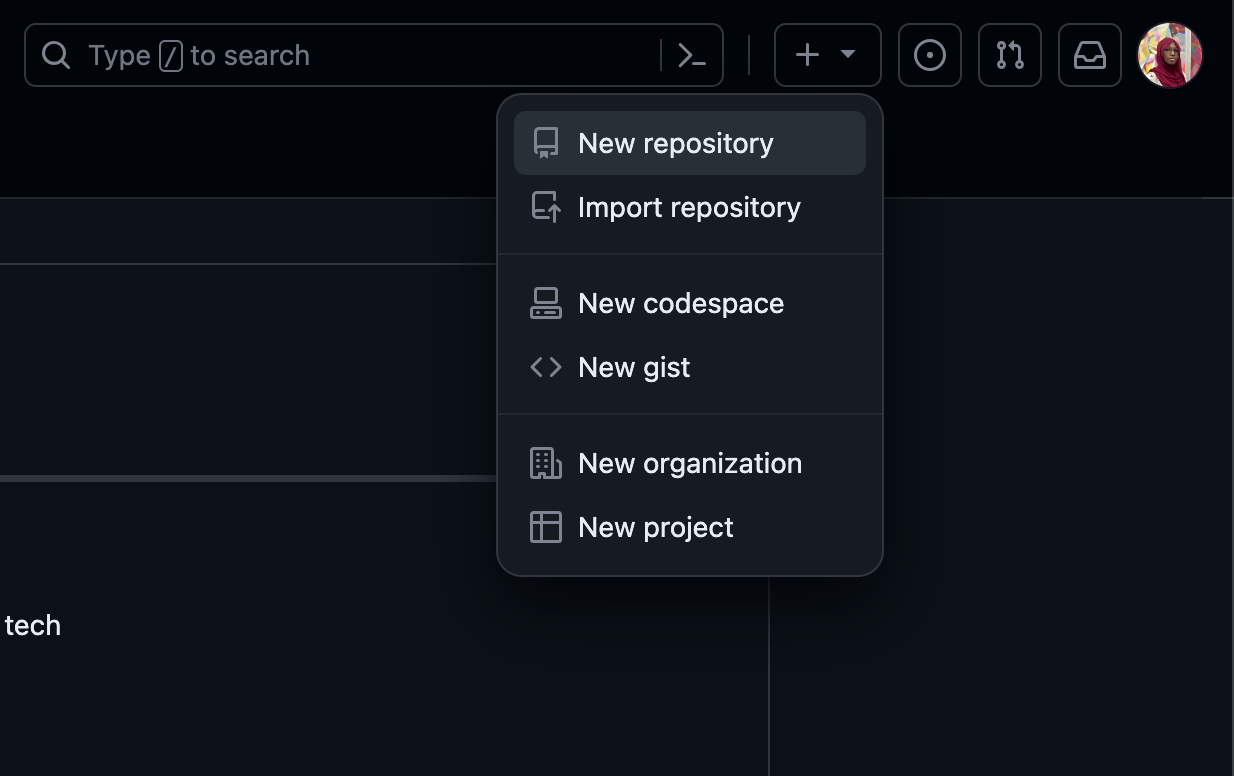
On the new repository creation page, enter a name for your repository. You can add an optional description, choose whether to include a README file and set the repository to public or private visibility.

Once you've configured the repository settings, click the "Create repository" button.

Create a folder with the same name as the repository on your local computer.
mkdir [repository_name]
After creating the folder, copy the code below the text “…or create a new repository on the command line” by clicking on the icon in the top right corner. After this, paste it into the terminal.

Your repository is now ready to use on GitHub, and you can start adding files, making commits, and collaborating with others.

Connecting a local Git repository to a GitHub repository
If you prefer to initialize a new repository on your local machine using Git commands, follow these steps in the terminal.
Open your terminal and navigate to the directory or the new project folder where you want to create the new repository.

Initialize a new Git repository:
git init
Make a first commit by adding/staging the modified files or a new file:
touch README.md
Stage the README file:
git add README.md
Commit the changes:
git commit -m "Initial commit"
Now, go to GitHub and create a new repository with the same name without initializing it with a README file.

Copy the repository URL provided by GitHub and add the GitHub repository as a remote:
git remote add origin [repository URL]
In the terminal, link your local repository to the GitHub repository using the following commands to push the changes to GitHub:
git push -u origin master
Now, your local repository is connected to the GitHub repository, and you can continue pushing and pulling changes as needed.
You can choose either of the two approaches when creating a new repository on GitHub.
Pushing and pulling changes
After making changes/commits on your local repository, adding or updating the remote repository on GitHub is important. The git push command is used to upload your local changes to GitHub. This ensures that the collaborative development environment stays up-to-date.
git push origin [branch_name]
The above command is used after changes are added and committed. By pushing the changes, the update is now available on GitHub to be accessed anywhere and by anyone.
In cases where you want to access these changes from a different computer or the project you are working on locally has been deleted, you can get all the latest changes made on your repository using git pull.
git pull origin [branch_name]
This command fetches the changes from the specified branch on GitHub and merges them into your local repository. It can also be used in collaborative development involving multiple contributors making changes to a project.
Features and collaborations
Different features or bug fixes are often developed simultaneously when working on a project with one or more other developers. To successfully create this project, developers must collaborate on a project with a unified goal in mind: To deliver a functional product that meets the project's specifications, satisfies user requirements, and ensures a seamless user experience,
Collaborating on projects
Working on other projects aside from your own found on GitHub is a great way to understand and enhance your skills as a developer. To collaborate on a project, this project can either be owned by another developer who would have to grant you access or could be an open-source project where you can freely contribute to the development. Either way, to contribute to a project/repository, the first step is to fork the repository.
Forking refers to the process of creating a personal copy of someone else's or an open-source repository. When you fork a repository, you clone the entire project into your own GitHub account, creating an independent copy that you can modify without affecting the original. After making improvements, you can submit a pull request to the original repository. This initiates a discussion and review process before your changes are merged.
Collaborating on GitHub involves effective management of issues and discussions. Contributors create and discuss issues, encouraging clear communication and collaborative engagement within the community. GitHub features like labels, milestones, and assignees help organize and prioritize tasks, streamlining project management and ensuring a focused and inclusive development process.
Conclusion
While this may be a lot to unwrap as a beginner, let's wrap up this guide on Git and GitHub by summarizing the essential concepts covered.
In this guide, we've taken a journey through Git and GitHub, emphasizing:
-
Version Control: Understanding the significance of version control in tracking changes over time.
-
Git Basics: Learning fundamental Git commands for staging, committing, and branching.
-
Creating a Repository: Whether you create a repository directly on GitHub or initialize one locally, understanding this step is fundamental to starting a project.
-
Pushing and Pulling Changes: Mastering the crucial steps of updating and synchronizing local and remote repositories.
-
GitHub Collaboration: Exploring GitHub for repository management, collaboration, and open-source contribution.
-
Features and Collaborations: Branching, merging, forking, and pull requests in collaboration.
As you embark on your coding journey, these concepts get easier to understand and explore. And as you progress, don't hesitate to explore advanced Git and GitHub features.
For further understanding of Git and GitHub concepts, visit these YouTube videos:
You can also check out these links for further explanation:
Take this guide one step at a time. Practice, experiment, and gradually build your proficiency. Always remember you start as a beginner before becoming an expert. Best of luck on your journey!
Take your skills to the next level
- AI-powered solution reviews
- 50+ portfolio-ready premium projects
- Professional Figma design files