Not Found
Not Found
Not Found
Not Found
Not Found
Not Found
Not Found
Not Found
Not Found
Not Found
Not Found
Not Found
Not Found
Not Found
Not Found
Not Found
Not Found
Not Found
Not Found
Not Found

Submitted

Responsive Product Card Component using CSS Grid

#accessibility#cube-css#foundation

@eby-coder

Desktop design screenshot for the Product preview card component coding challenge

This is a solution for...

  • HTML
  • CSS
1newbie
View challenge

Design comparison


SolutionDesign

Solution retrospective


I think I resolved all problems the code had but I would love it if you tell me any improvements you find that can be made to the code. Thanks

Community feedback

AntoineC 1,180

@AntoineC-dev

Posted

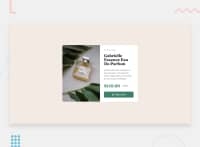
I see that your html is now showing on your site.

You will also need to give the correct path to you css for the styles to be applied.

<head>
  <meta charset="UTF-8">
  <meta name="viewport" content="width=device-width, initial-scale=1.0">
  <link rel="icon" type="image/png" sizes="32x32" href="favicon-32x32.png">
  <link rel="stylesheet" href="style.css"> ---- UPDATE HERE
  <title>Frontend Mentor | Product preview card component</title>
</head>

You might also add the following properties to your body tag to center the card on the page:

body {
  background-color: var(--cream);

  min-height: 100vh;
  display: flex;
  align-items: center;
}

And for you image to look always good (not distorted) add this:

.desktop-img {
  display: block;
  width: 50%;

  object-fit: cover;
}

Anyway continue with the good work and you will be a great developer in the future. Peace

Marked as helpful

1

@eby-coder

Posted

@AntoineC-dev I'm so embarrassed by what happened. I changed the names of my HTML and CSS documents and I forgot to update my link.css href. At first I couldn't understand what went wrong. I have changed it now and I hope the page doesn't have any other additional problems. Thank you for taking the time to help me. Have a lovely day.

1
AntoineC 1,180

@AntoineC-dev

Posted

@eby-coder I checked and now everything works; and by the way the result is great you did a good job with this project. It is 100% ok to make mistakes this is why the community is there to give feedback.

Keep practicing, building projects and having fun with your code :)

Peace ✌️

1
AntoineC 1,180

@AntoineC-dev

Posted

Hello Ebere Ndukwu. Congratulations on completing the challenge. I can see on the screenshots the you solution looks great but right now your live site is not properly working.

To fix it you should rename your file product-card.html to index.html so github pages can display it as intended.

I would also create a images or assets folder to put all your images as a good practice. Then you need to update your src attribute on images with images/my-image.jpg.

After you fix it let me know. I will come back to give you feedback.

I hope it helps you. Have a good night/day and happy coding.

Peace :)

Marked as helpful

1

@eby-coder

Posted

@AntoineC-dev Thank you for your feedback. I am still new to github and have not yet learnt how to effectively use it. I still don't know how to send folders to github as the process I'm using now only allows me to upload files. I would love it if you could show me how to upload folders to github.

On the issue of the file name, I didn't realise that it may pose a problem. Does this mean that all my html documents' name have to index.html for it to be understood by github?

Thank you once more for taking the time to give me a feedback.

1
AntoineC 1,180

@AntoineC-dev

Posted

@eby-coder Github is not so easy to understand as a beginner so i get what you mean no worries.

Here is a step by step on creating a project and sending it on github:

  • Install git on your machine with these instructions
  • create you project on your computer
  • open your terminal and navigate to the project.
  • Type git init to initialize the repo.
  • Create your README.md and .gitignore files as you did in your project then type the instructions below:
git add .
git commit -m "Initial commit"
  • Now go to github and create a new repository (Repositories --> New)
  • Give it a name and click on the green button "Create Repository".
  • Copy/Paste all the instructions in the section ...or push an existing repository from the command line
git remote add origin https://github.com/your-username/your-repo.git
git branch -M main
git push -u origin main
  • Now everytime you want to save your changes you use the
git add name-of-my-file.ext
git commit -m "I just made this changes..."
git push

You can also save all files at once with the instruction

git add .
git commit -m "I just made this changes..."
git push

Regarding the name of your html files. You should always have a file named index.html wich is the entry point of your site. If you want multiple pages you should create a .htaccess file with your routes or use a framework with built in routing.

I hope it helps. Feel free to ask if you have further questions. Peace

Marked as helpful

1

@eby-coder

Posted

@AntoineC-dev Thank you so much. I'll try these steps and see how much I understand.

1

Please log in to post a comment

Log in with GitHub
Discord logo

Join our Discord community

Join thousands of Frontend Mentor community members taking the challenges, sharing resources, helping each other, and chatting about all things front-end!

Join our Discord